Thursday, December 1, 2011

Wanna Roll with Us?


Here's one of the flyers I put together for my roller derby league.  We're currently recruiting new skaters, so anyone who is intrigued (or even mildly curious) about the bad-arse world of roller derby should come on by Recruitment Night--Skate with us and see what we're all about! 

We're looking for referees, non-skating officials (NSOs) and bout volunteers in addition to skaters, so men are welcome to attend as well! No prior experience is required. Feel free to ask if you have any questions!

Friday, October 28, 2011

Eatables!

Despite how sore I still am from our last derby practice (I fell on my arse...hard.  A lot.), I still managed to make today fairly productive.  Part of me regrets it only because I can't remember the last time I just sat around and watched movies all day, haha...

One of the errands I ran this morning included buying ingredients to make cheesecake!  A while back, my mom's friends brought back a ton of fruit for us from their trip to Ohio.  There was more than we could ever hope to eat before it all spoiled (and it was getting awfully close, believe me), so I was just looking for a means of using it all up.

In the end, I made 2 different kinds of cheesecake: 1 pear, and 1 lime-pawpaw.

Pear cheesecake with walnuts (on the bottom)

I'm not going to post a photo of the lime-pawpaw cheesecake because it looks like crap... :/

Both cheesecakes taste just fine, but they didn't quite set as solidly as I wanted.  And this was with me baking it twice as long as the recipe called for (there were even a couple of cracks along the top).  I'm going to make the assumption that the fruit puree to cream cheese ratio wasn't quite correct.  If only I could find my purple sweet potato cheesecake recipe...

In addition to the cheesecakes, I also made some quinoa!  Had some sitting around so I figured, why not?

Quinoa with peas, bacon and sliced almonds

I've made quinoa a number of times before, but for some weird reason, this batch was the best I've made so far!  It was so much more flavorful than others I've made, which I don't entirely understand because I didn't reduce the stock for more concentrated flavor like I normally do.  Maybe it was just the different combination of the ingredients that I used this time.

Eh well, if anyone would like the recipe, here it is!

Ingredients:
2 cups uncooked, pre-washed quinoa
1 cup sliced or slivered almonds
4 cups chicken stock
1 large, very ripe tomato, chopped into oblivion
5 large garlic cloves, finely minced (also into oblivion, unlike you like big ole chunks of garlic)
2 cups peas (I used frozen)
4 strips of bacon (chopped into whatever size pieced you'd like)
1 whole serrano chili pepper
Sea salt and black pepper to taste

Directions:
  1. Combine the quinoa and the almonds in a pan over a low flame.  Stir regularly until the almonds and quinoa are slightly browned.  Transfer to a pot (or in my case, the rice cooker)
  2. Cook the chopped bacon in the pan.  Once it's done, add the chicken stock to the pan as well.  Stir well to make sure you scrape up all the little browned bits (aka the deliciously fatty flavor, bwah ha ha).
  3. After you've brought the stock to a simmer, combine it with the almonds and quinoa in the pot.  Add the tomatoes, garlic, peas and the serrano chili pepper.  Don't chop up the serrano chili pepper until you know you can take the heat >;)
  4. Stir until evenly mixed, add salt and pepper to taste.
  5. If you're using a rice cooker like I did, just set it like you would for regular, white rice.  If you're preparing this on the stove, bring the pot to a boil, then reduce to a simmer.  Cook until the quinoa is tender, but still "chewy."  The little white tendril thingies on the grains should be visible. 

    Or you can just follow whatever directions are on the quinoa packaging :)
  6. Once the quinoa is done, don't forget to remove the serrano pepper!  An unsuspecting diner who bites down on that with either love you or hate you.  I'm guessing hate...haha.

Saturday, October 22, 2011

Homemade Candy Skulls!

The DuPage Derby Dames Halloween Bowl-A-Rama Fundraiser is this Sunday night!  My original plan was to contribute to both the craft table and the bake sale, but because of family-related insanity, I'm afraid I only had enough time to commit to one :(  I already bought all of my supplies for making Halloween-themed chocolate-covered pretzel rods, so the bake sale won out.

I'll be spending all day tomorrow making the pretzel rods and some chocolate lollies, but I spent the last couple of nights making another ghoulish-looking treat to accompany them:  Candy skulls!

Deliciously Gruesome!


1 white (vanilla), 1 red (also vanilla) and 1 chocolate!


Each skull is about the size of a baseball, if not a little larger.


The skulls are completely 3-dimensional and entirely edible.  And, if you crack the skulls open, you'll find that their brain cavities are infested with gummy worms.  Bwah ha ha ha!  >:P

I may or may not be a disturbed individual...

In case anyone is wondering about the process, I basically just partially filled a store-bought mold with enough Wilton's brand candy melts to coat the surface of the mold--I didn't want to fill the mold entirely because I wanted to have a hollow cavity to fill with gummy worms.  After the skull "shells" hardened in the freezer, I punched holes in the eye sockets and slipped a gummy worm through.  I crammed a fist full of worms in one of the skull halves and then used more melted candy to cement the front and back halves of the skulls together.

At this point, the skulls were really smooth and shiny (except for around the "seam").  It was pretty, but I wanted the skulls to have more of an aged or antiqued look to them.  In order to achieve this, I smeared small amounts of the chocolate melts all over the skulls to emulate the look of dirt and decay. 

I only made 4 for the fundraiser (and one of them might be raffled off as a prize).  So, if you want to get your hands on one, you'll have to stop by!

Or you can always commission one from me...  But you really ought to come to the fundraiser, too! ;)


Thursday, October 13, 2011

DuPage Derby Dames Halloween Bowl-A-Rama Fundraiser (*gaspsforair*)

I was tasked with working on a flyer for The DuPage Derby Dames Halloween Bowl-A-Rama Fundraiser.  Not having a lot of hi-res photos to work with, my natural inclination was to make a drawing for it.

And so I did :)


Remember, she's holding a bowling ball because the fundraiser is a bowling event!
There are no balls in roller derby otherwise...unless you're a coach or ref...HAHAHA
(Oh yeah, totally went there) :P


As you can see, this is merely the girl I drew for the flyer.  If you want to see the flyer itself, stop on by the DuPage Derby Dames website or check out the Facebook page!


Wednesday, October 5, 2011

2 More Photomatics - Goodbye and Good Luck!

Here are the second and third in the MS-SOS mixer photomatic series.  Once again, these feature photographs taken by Bruce "McMoosie" Berna.  

She's got a thunderous roar and speed like lightning!
#92 - It's Stormin' Stella!


She's so dangerous even her name is a weapon >:D
#27 - Lady Arsenal!

Unfortunately for us, Stella, Lady Arsenal and Legal Tenderizer all had to make the decision to leave The Dames recently.  I hope these photomatics will be considered appropriate parting gifts!  Ladies, I'm glad that I had the chance to skate by your side (or against you, as the case was at the mixer :P).  Good luck in all that you do!  You all be missed!

Saturday, October 1, 2011

Legal Tenderizer Photomatic

Remember how I said I had more derby-related projects I wanted to work on?  Well, here's one of them!
 

If she doesn't get you in the courtroom, she'll get you on the track!
Skating as #55, it's Legal Tenderizer!

This is the first in a small series of relatively simple photomatics I'm putting together using McMoosie's photos from the MS-SOS mixer.  It's basically just an animated GIF with a slightly snazzier sounding name :)  

More to come!

Friday, September 30, 2011

Roller Derby Ninja Costume - Photos!

As hectic as last week was, I miraculously managed to finish my ninja costume for the roller derby mixer event hosted by the Mid-State Sisters of Skate (MS-SOS) of Stevens Point, WI.  The overall design took a different direction than what I originally intended, and it turned out a little rushed and sloppy.  If anything, it was at least good practice for making another, better version.  A girl can never have too many ninja costumes!

Anyway, I thought I'd go ahead and blog about the process of making the costume.  I'm going to try to be as informative as possible without going into too many details, so this is going to be a pretty long entry, I'm sure.  Well, let's get started!

First of all, all of the participating skaters were mixed into different teams (I was on Team Ninja Kittens) and were responsible for providing their own appropriately colored "jerseys."  A plain T-shirt with a skater's derby number written in marker would have been enough, but costumes were encouraged as well.  

Um.  Costumes?  YES, PLEASE!  Being a cosplayer and all, I just couldn't pass up the excuse opportunity to make a ninja costume :P

My team was naturally assigned black as their team color, so I chose to work with black interlock fabric (a knitted T-shirt-like fabric) because it's soft, relatively cheap and offers a decent amount of stretch--an important factor when sewing activewear.  As a nod to my home derby league, The DuPage Derby Dames (whose colors are black and green), I opted to use green as a contrasting color as well.  


In case you're wondering what materials I used...Black and green interlock fabric, interfacing (to stiffen the collar), black and green all-purpose thread, opaque white fabric ink, measuring tape, pins, marking pens, ruler, paintbrush, 30-60-90 triangle, sheet of acetate, ex-acto knife (not pictured) and my trusty singer sewing machine! 

Not having a pattern to work off of, I used this great site as a reference for how to construct a basic kosode (the double-breasted kimono top/robe, whatever you'd like to call it).  I traced, cut out and sewed the pieces as per the directions, though I did modify the measurements a bit.  I just wanted to streamline the design to flatter my body as much as possible (no easy task, let me tell you).  I also didn't bother making the sleeves, and added two little ties to the inside as an extra precaution to ensure that the kosode wouldn't fly open on me.

Seriously, nobody needs to see that... 


The basic kosode left open to show the interior ties


Close-up!

And closed!


The directions on that site were very clear for the most part, but I did have a little bit of trouble figuring out how to cut the neckline.  That particular section was a little bit confusing so I'm not really sure if I ever did it correctly.  Even so, it still looked okay.

While attempting to finish the hem, I accidentally cut the the kosode shorter than I originally intended.  I had wanted it to come down like a skirt or dress, similar to Kurotsuchi Nemu from the anime, BLEACH. Though I wasn't happy with the length I simply finished the hem and moved on to the next step because I had little time to waste.  I hand-cut a stencil of my derby name and number out of acetate sheets and painted them onto a large square of black fabric with opaque, white fabric ink.  Then I loosely stitched the square to the back of the kosode like a big patch so that I could remove it easily enough with a seam ripper if I wanted to.  I just didn't want to paint my name and number directly onto the kosode itself because I wasn't sure if I'd want to keep the costume for other uses as well (like Halloween, cosplay or random ninja missions--you know how it goes).

Cutting out all of those infernal letters with an ex-acto knife was
murder on the fingers, let me tell you...

The patch sewn onto the back of the kosode


For the sake of movement ease, I decided not to make a super wide belt (obi) like Nemu's.  Instead I made a long obi similar to the kinds worn with martial arts uniforms, only just a little bit wider (about 3.5" wide).  Without realizing it, I stretched the obi fabric too much when I was sewing it, resulting in irregular, scalloped edges.  Fortunately, the scalloping wasn't really apparent when the obi was tied taut around my waist.


Folded up obi and two armbands marked with my derby number.

Also, if you know what my number is a reference to, you are awesome.
And by "awesome" I mean you're a ginormous dork like me :P

In addition to the back of their shirts, skaters are also required to display their derby numbers on their arms or sleeves as well.  Again, I could have just written the numbers across my arms with marker, but I wanted a more permanent option.  With some leftover green fabric that I had used for the obi, I threw together 2 very sloppy armbands and stenciled my derby number on top.


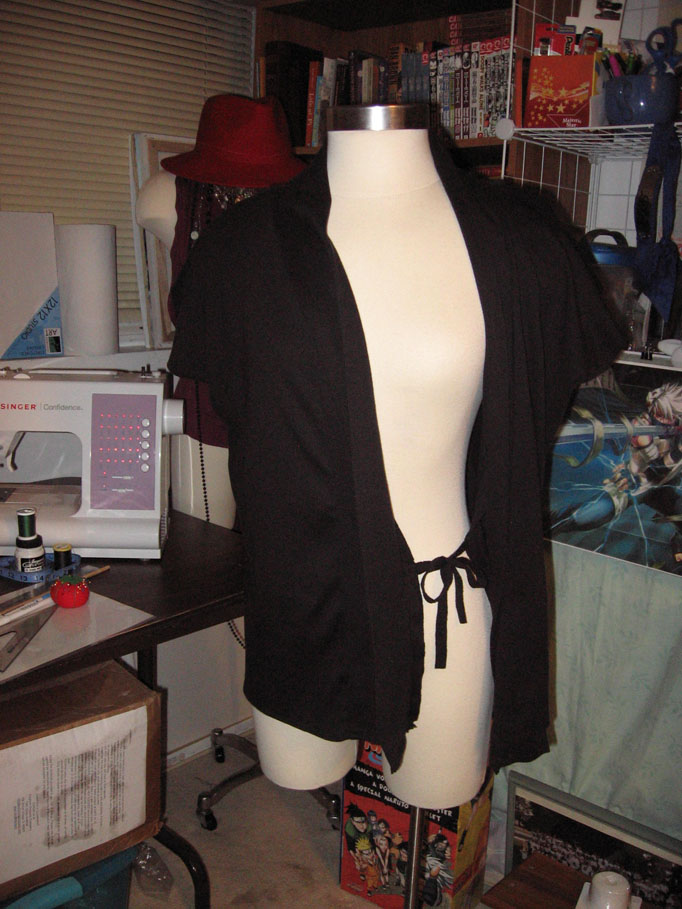
Here is a photo of the kosode and the obi on the mannequin.  It hangs a little differently on it than on me because the mannequin is about half my size... but you get the general idea.


To complete the outfit, I wore a pair of black soffe shorts and a fishnet body suit underneath that I had worn years back for my Mitarashi Anko (Naruto) costume.  You can see the complete costume in action in the photos below!  All of the following photos were taken by Bruce "McMoosie" Berna.  He has literally thousands of photos he took at the bout posted on his Flickr account, so go give him some love!


Introducing #N7 - Knuckle Sammich!  (aka "Knuckles")


The obi was tied extra tight for the bout (skaters can pull on their teammates' bodies--this includes belts--to propel themselves forward), hence why it looks so narrow in the photos. 

 Stoic ninja pose?
I would like this photo better if I didn't have the Mouth Guard Puffy-Face going on, haha...


 As sloppy as the whole costume was, I was pleased with the end result.  It received some compliments, it was comfortable and it didn't unravel or open accidentally despite the rough activity and several falls.  And thank goodness for that because God forbid my name and the phrase "wardrobe malfunction" should ever be in the same sentence...Hahaha :P

Until next time!

P.S.  I'm sure everyone is more or less sick of hearing me go on and on about roller derby, but I do have a couple of other derby-related projects in mind... Just thought I'd give fair warning :)